
How to construct mid 18th century fully boned stays with a stomacher front.
Step one: the fitting.
This is the most important step, so take your time, enlist friends as needed and it will pay off in the end.
materials:
 Pattern. I am using Reconstructing History #833 with the natural back & stomacher front options (shown in red on the pattern cover)
tracing of the chosen size of your pattern with any preliminary changes already marked
duct tape
large piece of corrugated cardboard. I get all my cardboard boxes from the local recycling center, so long as there aren't any raccoons living in them.
Sharpie marker
strong scissors
scrap linen
lacing cord or old shoelaces
hole punch
optional: small hammer
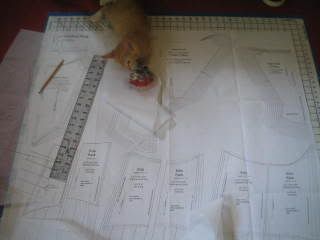 1. First make the tracing of your stays pattern. Because stays are an individualized item, there is no way that even the best commercial pattern is going to fit perfectly. I use pattern ease for all my pattern tracings, although any large, easily see through material would work. Note: Kitten help optional.
2. Lay out your cardboard in one large sheet. Place the cut out pattern tracing on the cardboard, orienting the pieces so that the channels in the cardboard run the same direction as any boning lines. On pieces where boning will run in multiple directions there are two options. Option A; cut multiple pieces of cardboard and tape them together to create the needed piece or option B; cut the piece with the channels in the direction that the majority of the boning channels will run. Trace all pieces with your Sharpie marker.
 3. With sturdy scissors and a good movie on TV, cut out all the cardboard stay pieces, including the fingers (aka tabs). Use duct tape liberally to connect all the pieces into a 3-D cardboard copy of 18th century stays. Add extra tape at the waist near the top of the fingers and on either side of all laced openings.
4. Mark the lacing holes on all 4 pieces. The back should be arranged off-set to accommodate spiral lacing, while the front holes are set parallel for straight lacing. Use a hole punch to make all the holes, using a small hammer to force through the cardboard as needed.
5. Before trying on this cardboard creation, if you pattern has straps now is a good time to add them. I use scrap linen for my straps, since they will not be boned in the final set of stays, and therefore do not need the stiffness of cardboard. Cut & duct tape the shoulder straps in place but be prepared, their placement may need adjustment during the next step.
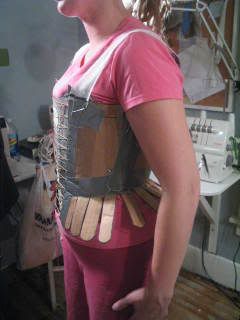
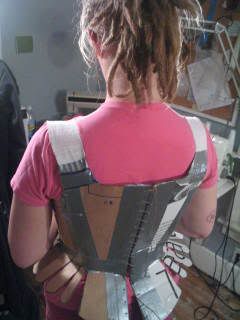 6. Lace the back panels together edge to edge. Now put the cardboard mock up on, lacing the front over the stomacher panel as if they were real stays & not some odd recycled art creation. While wearing this mock up note any discomfort. Move and bend as you will while wearing the final set of stays. Are the arm pits too high? Stomacher seem a little short? Back standing out & giving you that oh so 18th century ridge? How about the strap placement? What about the length of the fingers when you sit down? Use the Sharpie marker to mark any changes and areas that just don't feel comfortable. Remove the mock up and make any cuts and tape alterations. Alternately if you've got a trusted friend at hand, have them make the needed changes while you're still wearing the mock up. I also find have photos taken of this fitting stage to be extremely helpful. I can't always see my own back, but with photos I can & can make changes to the pieces by looking at the images.
 7. Remove the altered mock up and lay as flat as possible. Over lay your pattern tracing pieces with the corresponding cardboard piece. Use tape, additional pattern easy & your scissors to transfer all changes to the pattern, adding or cutting away from the pattern tracing to customize the pieces.
8. Congratulate yourself with a big glass of Mikes Hard Lemonade, you've just customized your very own pattern for stays!
Next up: Cutting the fabric!
I want to make myself a boned corset just to wear. Wanna come over and help me?? :P
ReplyDeleteThat's a great idea- I've made several corsets and stays, but never thought to try it out first w/ cardboard! Could have saved myself some time!
ReplyDelete