
How to construct mid 18th century fully boned stays with a stomacher front.
Step two: the construction.
If you're just joining us, please refer to Part 1 for the fitting tutorial. Stays are custom items so the most important step is in the fitting. Take your time making the pattern perfect for your shape before proceeding. Trust me, it's well worth the effort.
materials
Custom pattern from Stay the Course, Part 1.
~1 yard chosen outer fabric. Linen or light weight wool are good choices, easy to come by & work well.
~2 yards inner lining fabric. Heavier weight linen works wonders as inner lining on stays
1 roll reed boning of your choice. I have used both 1/4" full round and 1/4" half oval reed. The full round is significantly stiffer but both work well. The choice will depend on how firm or flexible you want the final stays to be.
plenty of durable thread
ruler
disappearing marking pen or chalk
something good to watch on TV or a new audio book to listen to while you work.
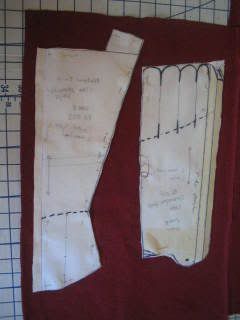 1. Cut 2 layers of piece out of inner lining leaving a generous seam allowance around all sides. If you are, however, working from random scraps as I am, then cutting directly on the pattern lines might be necessary. Do Not separate the tabs at this point, instead cut a box around them. You can almost see this in the photograph below. Leaving the tabs for later makes the entire piece so much easier to handle & insures that your boning channels don't land on a cut line.
2. Lay your lining & pattern pieces on top of your outer fabric. Cut out the outer pieces, leaving the same generous seam allowance around all sides, but especially around the sides that will be connected.
3. Measure the width of your reed and round up slightly. This make it both easier to slip the boning in each channel & accounts for any variation in each piece.
 4. Measure & mark your boning channels. This is the point where I usually find myself running to the V & A or another museum site to look at every extant example of stays I can find. Take your cue from them as to which direction the channels on each piece of your stays should run. Straight at the center back and lacing strips yet with the direction of the tabs seems to be the most common arrangement I have seen.
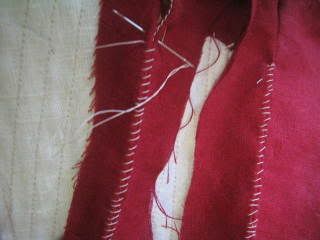
5. Sew all those channels. If sewing by hand, a back stitch is the best bet as it is very sturdy. On the sewing machine a nice small stitch is preferred. When sewing the channels by machine it is faster not to cut the individual threads until the last line is reached. Instead, simply move the needle to the next line leaving a short tail in between each. These strings can all be pulled to the inside of the stays once each channel is sewn.
6. Fold the excess outer & lining fabric to the inside of the stays along the pattern line. Why did we leave that extra fabric? Two fold (sorry bad pun!). One, because it allows the material to shift while sewing the boning channels without disturbing the final construction and two, so that there is excess to "let out" should we need to expand the size of these in the future.
 7. Place 2 pieces right side to right side, lining up the edge we just folded inside. With a sturdy thread whip stitch the two sections together. Stitches should be consistent and close together, these are the main seams after all. Many seamstresses will use this seam as the second side of the last boning channel. I prefer to sew the channels fully by machine & simply sew over that line when whip stitching sections together. Either way is just fine.
8. Mark your lacing holes. The back of these stays is laced using spiral lacing. The stomacher front is laced using 1 cord through parallel eyelets. On front & back lacing stays without a stomacher it's best to use spiral lacing on both pieces. I always check my marks at least twice, mentally lacing them up to check the arrangement & spacing.
 9. Sew all those eyelets. You are allowed 1 complaint about how much of a pain they are to sew per hole. In this pair I stitched the eyelets twice, going around once with 5 or 6 stitches to hold the opening, then filling in the space on the second round. I have since been advised to use a doubled thread & only sew around the holes once. Surprisingly, I've found the double thread to make a much nicer, durable opening & it doesn't seem to take as long!
10. Decide where the best separations for your tabs are going to be, making sure that no tab as too few or too many boning channels. I generally try to have ~4-5 channels per tab. Mark & cut the tabs apart.
10. Stuff each channel with reed. I'm using 2 pieces of 1/4" half round reed back to back to create an oval reed. I've found this to be both supportive & flexible. I also discovered that very lightly waxing each piece of reed helps cut down on splintering & keeps it from catching on any stubs in the material as it's being pushed into the channels.
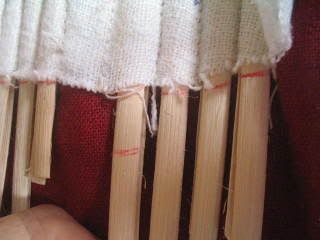 11. Trim each reed to fit leaving an ~1/4" space at the top & bottom of each channel. This gap will make adding the binding easier in the future. The photo is of how I mark the individual reeds. This method doesn't conserve much reed, but it's what I've found works best for me.
11A. (optional) If you are going to be wearing these stays prior to finishing the binding, as I did, it's best to sew along the top & bottom of the channel's to secure the reed. This little trick gave me the time to wear the stays before I found the time to fully finish them.
12. Remember that outer fabric that was folded to the inside?
 Now is the time to tack it in place with a loose whip stitch. This isn't mandatory, but it does make for a nicer inside. Just try not to stab yourself & bleed all over the stays. Ouch!
13. Repeat sewing & stuffing the boning channels for the stomacher front. The boning can either run vertical or connect in a center "V", which is very attractive but a little harder to bone.
14. Attach the straps. Leave extra length at the front for customization. While wearing the stays, mark where the straps hit the front edge & trim to fit.
15. Check yourself out in the mirror. Marvel at the lift, the curves & all the hard work that's gone into these stays so far.
16. Take a nap before proceeding to Step 3, finishing!
Hi Chole, it's Connie from Frontier Folk. We met last September at Kohkohmah. :)
ReplyDeleteI just found the Blogger here and your site when I signed up for one for my drawing class at IUS.
I got a couple chuckles this morning from this post. I liked the parts about having a new audio book and taking a nap at the end. Those would be me for sure!
Corsets..coooool. Help squish my stomach in a little. :p
ReplyDeleteIf I ever get round to making that 18th century costume I want, I will definetly use this blog to make the corset.
ReplyDeleteThanks so much!
Chloe,
ReplyDeleteYou are such an inspiration! I must get out that stays pattern Mara Riley fitted to me and get to work!!!
Pardon if this is an ignorant qustion, but...how does the stomacher stay in? Is it just pressure from the lacing or are there hooks or something holding it in? I really need to make a proper mid 18th, and that one looks vera nice! ;)
ReplyDeleteChris-
ReplyDeleteThe stomacher is not attached in any way to the body of the stays. It remains in place due to the lacing & general "pressure" of the stays being laced on.
Hope that helps.
Chole
Hi, love your work and this blog: it's been oh so very helpful as I try to copy a pair of green stays that the Met has on line! I could be wrong, but it seems to me that you made some interesting choices and alterations between the pattern, your initial cardboard mockup (so cool!) and the gorgeous finished product, such as less fingers or tabs in front, and fingers that were twice as long as than those in the pattern? Would you mind sharing your reasons for these changes? Was it a comfort thing, or to evoke a certain period, or to flare petticoats in a particular way, etc? Or just general hotness? :D
ReplyDeleteThanks again for sharing your pictures!
Eleanor
Eleanor-
ReplyDeleteAny changes to the original stays pattern were done for fit & comfort. It's important to remember that stays are a custom item, fitted to the individual, so changes will be needed to match individual proportions.
The number of fingers was determined by the boning. Each finger has no less than 4 bones in it for stability. Some of the fingers did have to be adjusted to prevent half channels and to insure enough bones for stability.
The length of the fingers shown in the photo is before shortening them to a proper length for my size. In that photo they are the original length from the pattern. However, I am very short waisted, which placed the opening of the fingers higher, making them seem very long (which they are, on me). Again, it's just another aspect of fitting to the individual.
Hope that helps.
Chole
Hello, and thank you for all the hard work you did publishing your very helpful (and entertaining) tutorial! I was curious: it seems to me that there is a difference between your cardboard stays mock-up and the red finished product, esp in the areas inside the hipbone: some finger/tabs from the side-front seem to be gone? If so, could you talk us through this change: was it for comfort, size, a certain time period reference, or something else?
ReplyDeleteThanks for any info and I hope you're still enjoying your finery very much! :D
Eleanor